Snowflake Drawing Instructions: How to Draw an Advanced Snowflake. Drawing a snowflake is much more convenient than you might think! Learn how to make your snowflake design with our easy guide
The air is fresh, and the temperature is dropping quickly: you are not alone if you look at the sky and hope for snow!
We think there is something so magical about this time of year and one of our F the arrival of those beautiful and intricate snowflakes falling from the sky.
Today we’re heading to guide you on creating your snowflake design, from the skeleton to a little more detailed if you go a little further.
This tutorial is for both kids and adults, and over time we’ll build on these more straightforward steps. So this is an excellent activity to have fun with you and the kids!
It’s also a great way to practice your math skills in secret – snowflakes are generally six-sided and symmetrical.
To get the most out of our design, we use rulers and measure our lines in the process.
Instructions
This can be a smallish tricky for younger youngsters as it requires a lot of tolerance and accuracy, but once they’ve made their first snowflake, it becomes a little more natural, although they may need your guidance.
Get started.
You can always replace the ruler with a protractor if that’s easier. If not, a standard 12-inch sovereign will work simply fine.
The most useful way to evaluate your design is that the distance between each of your six components is a “piece” of the snowflake, and each piece should peek equal to the other.
If you think certain sections aren’t quite right, it’s always better to take the ruler back and see if your measurements are slightly off; It’s not something a tire can’t fix.
We suggest operating pencils to obliterate blunders, but you can make your snowflake structure with almost anything – once their plans are ready, don’t let the children count snowflakes – snow with glitter glue, pastels or paint. You can also check out pencil drawing ideas.
For the snowflake design, we recommend a lighter colour first – let’s use a soft blue pencil – as this choice drive it more straightforward to rectify the work and build up shadows and details later.
We believe these snowflakes glance fantastic on Christmas cards, and your household will value the kids’ handmade designs.
So clear out the dining table, grab your painting supplies and get ready to try the easy drawing tutorial. The snowflakes!
We’ll cover the kids’ section of the tutorial first, but adults should be careful too – you’re following the same steps, just with a few extras at the end.
Read on to understand how to create your simple snowflake design. Read on to learn how to set up a snowflake.
How to draw an Advanced snowflake
you will need
- A4 paper
- A clear ruler so younger artists can see what they’re doing
- Graphite pencils or coloured pencils, we use a few shades of blue as well as a purple and a light pink
- Eraser or fountain pen
- White charcoal pencil (optional) for mixing colours and adding shine
- Easy snowflake design for drawing snowflakes
More advanced snowflake design
How to Draw Pentagon Drawing – Step-by-Step
Step 1
The essential part of the tutorial has been completed, so now is the time to add a negligibly more additional to your snowflake if you like to create your own and construct it better complex and natural! Make sure your pencils are freshly honed for this location, as we will need a more minute moment for our snowflake to look the best.
While you do this, kids can decorate and personalize their snowflakes as they see fit.
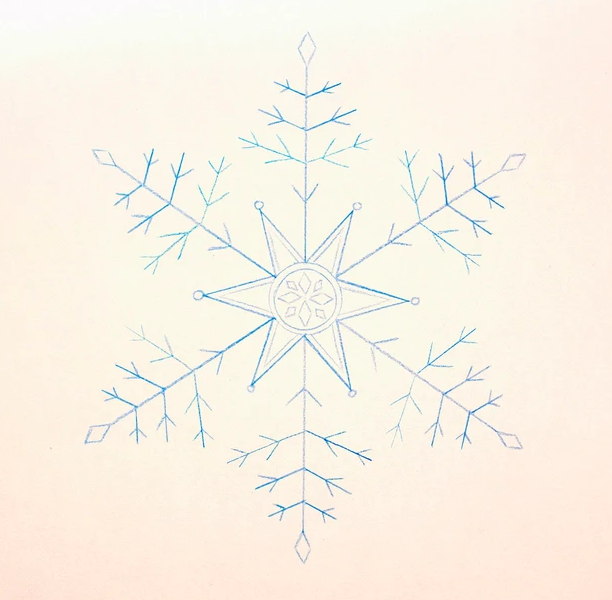
First, we added an extra attribute to the middle of our snowflake structure, with stripes inside the triangle and some diamonds inside the process, despite what you do here is totally up to you! We also want our snowflake to be a bit thicker, so we added a few extra branches to make the snowflake look fuller.
Step 2
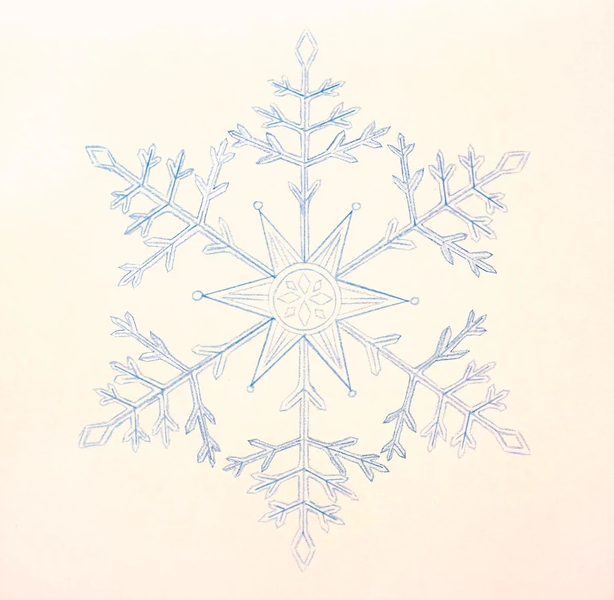
We are now going to add a contour to our existing snowflake to build up its structure – the thickness of the silhouette is up to you, we went for a thinner and sharper snowflake, but if you want a slightly thicker shape, you can too. It’s also an excellent opportunity to add more detail to the outline of your snowflake as you wish – we want the tips of our snowflake to look sharp, so we’ve added the branch tips to be more triangular, similar to the information of a sword.
It should look like a pointed triangle once this is done on both sides. Do the same for each of your snowflake discs, and you will eventually have a spiky star shape in the centre of your design. If you want to find the centre point where you want your circle to sit, use the ruler to measure the distance between your disks and see where the centre point should be – if your snowflake disks are not the same distance from each other, this distance can change by each slice, so we recommend measuring them for each section.
Step 3
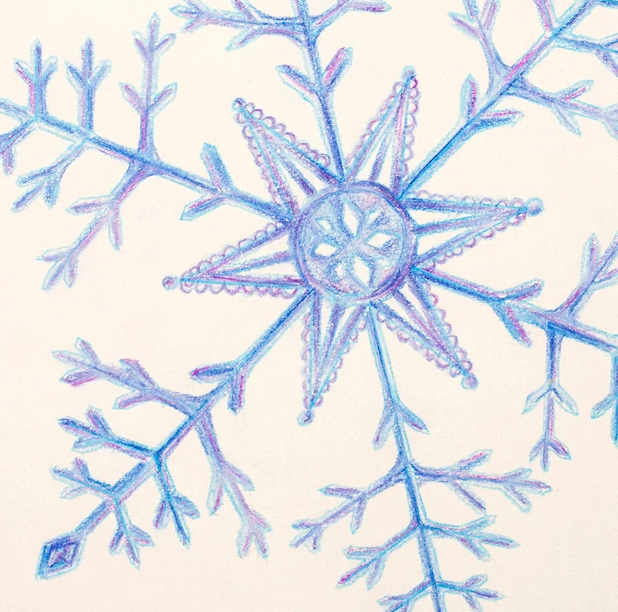
Next, we’ll use our coloured pencils to add colour and depth to our design. We’ll use a few different shades of blue, plus purple and pink, to show a colour change as the snowflake’s edges catch the light. Use small brush strokes and subtle nuances here – we like to start with the lighter nuances and gradually build up and then add darker nuances for the shadow.
We left the baselines in the centre of our snowflake but made them darker with a deep blue to give each branch a three-dimensional, raised quality, and added some of the edges to purple and pink.

We also added a lace pattern outside our central star shape.
Step 4
Our final step includes the optional white charcoal pencil, in case you chose to: examine the areas of your snowflake that you want to be lighter, as well as the places where light and dark appear most prominent; This will help soften the lines and add a slight sheen to your snowflake, creating a frosty look. If you’ve selected to draw a considerable snowflake with wider boundaries, you can accomplish a comparable result by utilising an eraser to erase areas and design highlights.
Finally, use a freshly sharpened pencil of a light shade to go back any edges that don’t look as sharp as you’d like by carefully working with the pencil – this will help keep the drawing on the edges looking a lot cleaner.
And that’s it: now you know the easiest way to make a snowflake by drawing! Now that you know the basic structure and rules for drawing a snowflake, it’s time to customize both your technique and your design to your liking.

The circle in the centre of your procedure may become a hexagon instead, or you may want to add more external branches.
You can even change the design of the pointed star shape to something more detailed and intricate if you take up the challenge!

We encourage you to browse the macro photos of snowflakes for ideas of different designs, but remember, the possibilities are endless, so the most important thing is to play and have fun!
Also read: Benefits of Online Quran Classes